
Vinyl Trends 2024: What Every Artist Needs to Know
As vinyl continues to thrive in 2024, fans are looking for more than just a record—they want a complete experience. Whether it’s limited edition pressings, eco-friendly options, or unique packaging, these trends can help artists and labels make their vinyl releases stand out.
The Rise of Limited Edition and Collectible Vinyl
A major trend in 2024 is the growing demand for collectible and limited-edition records. Fans are seeking unique pressings that go beyond standard black vinyl. Vibrant colored vinyl, splatter effects, and picture discs have all captured the interest of collectors.
Limited-run, numbered editions allow artists to create scarcity and boost desirability. Fans love owning something exclusive, especially if it’s tied to a special event or release. This presents a great opportunity for musicians to engage with their audience. Offering custom pressings that match the album’s theme or live tour can add significant value.
Eco-Friendly Vinyl Options
Sustainability is becoming increasingly important to music fans, and many are paying attention to how their favorite artists approach environmental responsibility. In 2024, eco-conscious vinyl options are gaining traction, with Eco Mix vinyl leading the way. This type of vinyl uses leftover materials from other pressings, resulting in unique, random colors for each record—perfect for fans who want something one-of-a-kind and eco-friendly.
Artists can tap into this trend by offering sustainable vinyl pressings, packaging, and marketing. Emphasizing eco-friendly practices in your release helps position your brand as conscious and responsible, which can resonate strongly with a growing segment of the fan base.
The Return of 180g Vinyl
Fans want a personal connection to the artists they love. Customization is becoming key to delivering that experience, especially through vinyl. Musicians are now offering custom colors, unique packaging, and special inserts that elevate the record beyond the music.
Limited-edition pressings with exclusive features, such as signed copies or colored vinyl variations, are growing in popularity. Personalizing the fan experience can build a stronger bond with your audience. These small touches create an emotional connection that digital formats can’t replicate.
Expanding Customization Options
In 2024, fans want more than just music—they want a personal connection to the artists they love. Customization has become key to delivering that experience, and vinyl records are no exception. Musicians can offer custom vinyl colors, unique packaging, and even special inserts or booklets that add value to the physical release.
Artists should consider providing limited-edition pressings with exclusive features, such as signed copies, colored vinyl variations, or inserts with personal notes or artwork. These touches not only enhance the fan experience but also help build a stronger connection between the artist and their audience.
The Impact of Vinyl on Fan Engagement
Vinyl isn’t just a format—it’s a way to connect with your most loyal fans. Artists are leveraging vinyl releases to deepen their relationships with listeners. Offering vinyl as part of fan club memberships or exclusive bundles is a powerful tool for engagement.
In a digital world, vinyl gives fans something tangible. It’s more than music; it’s an experience. For independent artists, this can be a game-changing way to build lasting support. Limited vinyl releases can turn casual listeners into lifelong fans.
The Role of Vinyl in Live Shows and Merch Tables
Vinyl continues to be a top seller at live shows. Fans are drawn to the collectible nature of records, which makes vinyl one of the most sought-after items at merch tables. Many artists are creating tour-exclusive pressings that are only available at shows.
Bundling vinyl with other merch items, such as t-shirts or posters, is also a great way to increase sales. Fans love walking away from a show with a piece of memorabilia. For musicians, this is an opportunity to boost revenue and leave a lasting impression.
Digital Meets Physical: Vinyl with Digital Extras
The line between digital and physical continues to blur. In 2024, musicians are combining vinyl records with digital extras, offering fans hybrid experiences. Digital downloads, exclusive content, and even NFTs are becoming part of vinyl packages.
This trend allows artists to bridge the gap between the tactile nature of vinyl and the accessibility of digital content. Tech-savvy fans love this combination, and it provides musicians with a new way to engage them. Offering vinyl with digital bonuses adds extra value to the physical release.
Conclusion
Vinyl continues to evolve as a powerful medium for artists to connect with their audience, offering more than just a listening experience. In 2024, trends like limited edition pressings, eco-friendly options, and customization are shaping how musicians and labels approach vinyl releases. By staying ahead of these trends and creating unique, collectible records, artists can tap into the growing demand for vinyl and build stronger relationships with their fans.
Ready to explore the possibilities for your next vinyl release? At Solid-Merch, we specialize in helping artists create unforgettable vinyl records. Contact us today to get started!
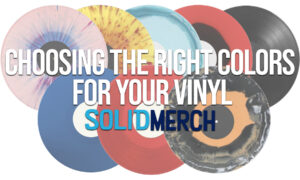
Choosing the Right Colors for Your Vinyl Pressing
Vinyl records are more than just a medium for music; they’re a canvas for creativity. For independent musicians, choosing the right color for your vinyl can be a powerful way to express your artistic vision, connect with your audience, and even enhance the listening experience. But how do you strike the perfect balance between visual appeal and audio quality? This guide will help you navigate the process of vinyl record pressing, so you can make informed decisions that elevate your music and make your vinyl truly stand out.
The Basics of Vinyl Color Options
When it comes to vinyl record pressing, the possibilities are endless. From classic black to vibrant colored vinyl, the choices can feel overwhelming. Standard black vinyl remains popular for its traditional look and reliable sound quality. However, colored vinyl—whether it’s a solid hue, transparent, or a striking splatter pattern—has gained significant traction in recent years.
Each color option offers a unique way to represent your music. Bright and bold colors might suit an energetic punk album, while softer pastels could complement a more mellow, acoustic record. Transparent vinyl can create a sleek, modern aesthetic, and splatter effects add an element of surprise and intrigue. Knowing the options available is the first step in making a choice that resonates with your music and audience.
The Impact of Color on Audio Quality
One of the most common concerns among musicians and audiophiles is whether colored vinyl affects sound quality. The short answer is: it can, but the differences are often subtle. Black vinyl is traditionally seen as the standard for optimal sound quality because it contains carbon black, a material that strengthens the vinyl and reduces surface noise.
Colored vinyl, on the other hand, doesn’t include carbon black, which can sometimes lead to slightly higher surface noise or minor variations in sound quality. However, advancements in vinyl record pressing techniques have minimized these differences, making colored vinyl a viable option without significant compromises. If audio quality is your top priority, it’s worth discussing the specifics with us to understand how different colors might affect your final product.
Vinyl Color and Your Album Art
Your vinyl’s color should be an extension of your album’s artwork and overall aesthetic. When done right, the color of your vinyl can enhance the visual impact of your music. For instance, a bright red or orange vinyl might perfectly complement fiery album art, while a translucent blue could echo the serene tones of a more ambient project.
To make this decision easier, we are in the process of creating a mockup tool, which should be ready within the next few months! In the meantime, feel free to reach out to us and we’ll be happy to help you visualize your album’s aesthetic. This step is crucial for ensuring that your vinyl and artwork are cohesive and visually striking. Keep in mind that the color of the vinyl can alter the perceived hue of the artwork, so it’s essential to view them together before making a final decision.
Considering the Collector’s Market
For many musicians, vinyl isn’t just a format—it’s a collector’s item. The color of your vinyl can significantly influence its appeal in the collector’s market. Limited edition runs, special colors, or unique effects like splatter or marbling can make your vinyl more desirable and valuable to collectors.
Trends in the collector’s market often favor exclusive or rare color variations. For example, a limited run of a splatter vinyl might sell out faster and command higher prices than a standard black pressing. If you’re aiming to create a collectible item, consider incorporating special colors or effects that align with current trends or the unique theme of your album.
Special Effects and Unique Vinyl Colors
Beyond standard colors, there are many special effects and unique vinyl options to consider. Splatter vinyl, for example, features a base color with additional colors splattered across it, creating a one-of-a-kind design. Marbled vinyl blends multiple colors to produce a swirling effect, while picture discs allow for full-color images to be pressed directly onto the vinyl.
These effects can add an extra layer of artistry to your album, making the physical record as engaging as the music it holds. However, it’s important to weigh the visual appeal against potential impacts on audio quality and cost. Special effects can sometimes introduce slight variations in sound, and they often come at a higher price point. Carefully consider whether the visual impact is worth these trade-offs.
Budget Considerations
Choosing the right color for your vinyl isn’t just about aesthetics; it’s also about budget. Different colors and effects can have varying costs, and as an independent musician, it’s important to find a balance between what looks great and what fits within your budget.
Solid colors tend to be the most affordable, while transparent, marbled, and splatter effects often come at a premium. Additionally, special edition colors or unique effects may require higher minimum order quantities. To get the best value, consider what aspects of your vinyl are most important to you—whether it’s the color, the audio quality, or the overall cost—and make your choice accordingly.
Choosing the Right Color
Choosing the right color for your vinyl is a blend of creativity, practicality, and strategy. By considering the visual impact, potential effects on audio quality, market appeal, and your budget, you can make a choice that truly reflects your music and resonates with your audience.
Don’t be afraid to experiment and push the boundaries of what’s possible with vinyl. After all, your music is unique, and your vinyl should be too. If you’re ready to explore the possibilities, Solid-Merch is here to help. Contact us today to start your next vinyl project!
Vinyl Pressing For Bands and Labels
Vinyl records offer a tangible and nostalgic way for fans to enjoy music. For independent bands and labels, pressing custom vinyl records is an exciting opportunity to connect with listeners and create a lasting impression. If you’re considering pressing your first vinyl record, this guide will walk you through the essentials to ensure a successful release.
Preparing Your Audio Files
The first step in custom vinyl pressing is preparing your audio files. For optimal sound quality, you’ll need high-resolution WAV files that are mastered specifically for vinyl. Unlike digital formats, vinyl has unique sonic characteristics that require special attention during the mastering process. Here’s what you need to know:
- Mastering for Vinyl: Ensure your audio is mastered with vinyl’s dynamic range and frequency response in mind. Vinyl records can capture rich, warm tones, but they can also highlight certain frequencies. A professional mastering engineer can help balance your mix for the best possible playback on vinyl.
- High-Resolution Files: Provide 24-bit WAV files to capture the full depth and detail of your music. Avoid using compressed formats like MP3, as they can lead to loss of quality.
Designing Your Artwork
Great vinyl records aren’t just about the music—they’re also about the visual experience. Your artwork is the first thing fans will see, so it’s important to make sure it’s professionally designed and formatted correctly:
- Use Our Templates: Download and use the artwork templates provided by Solid-Merch to ensure your designs fit perfectly on the vinyl jacket and labels. Proper formatting avoids any surprises or delays during the printing process. [Link to Templates]
- High-Resolution Images: Ensure all images and graphics are high-resolution (at least 300 DPI) and in CMYK color mode to maintain quality during printing. Avoid using low-quality images, as they can appear pixelated or blurry.
- Consider the Layout: Remember that your artwork will be printed on a physical format. Elements like text should be legible and placed with care, keeping in mind that there will be cut and fold lines on the packaging.
Choosing Your Vinyl Options
When pressing vinyl, you have several options that can affect the look and feel of your final product:
- Vinyl Weight: Decide between standard weight (140g) or heavyweight (180g) vinyl. Heavier records can feel more substantial and may offer better durability.
- Color and Finish: Choose between classic black or colored vinyl. Special effects like splatter or marbled finishes can add a unique touch. Consider whether you want a glossy or matte finish for your jacket as well.
Final Steps and Considerations
Before you proceed with pressing, double-check all elements to avoid potential issues:
- Proof Everything: Review your audio and artwork proofs carefully before giving final approval. This step is crucial to catch any last-minute errors.
- Plan for Production Time: Vinyl pressing can take several weeks to complete, especially during peak demand periods. Plan your release schedule accordingly to ensure your records are ready when you need them.
- Order Extras: Consider ordering additional copies to account for promotional needs and potential sales beyond your initial expectations.
Pressing custom vinyl records is an exciting milestone for any independent band or label. By following these guidelines and working closely with your production partner, you’ll create a record that not only sounds great but also serves as a cherished keepsake for your fans.
Feel ready to get going on your order? Click here to get started on your order!
For more information and personalized assistance, feel free to contact our team at Solid-Merch by emailing [email protected] or calling us at (844) 413-2848. We’re here to help make your vinyl pressing experience as smooth and rewarding as possible!
Understanding Direct Metal Mastering – Vinyl Record Pressing
Vinyl records have seen a resurgence in popularity, cherished by music enthusiasts for their unique sound and nostalgic appeal. At Solid-Merch, we are dedicated to providing high-quality vinyl pressings using the Direct Metal Mastering (DMM) technique. In this post, we’ll explain how DMM works and why we have chosen this method for our pressings.
History of Vinyl Pressing
The process of pressing custom vinyl records has evolved significantly since its inception in the early 20th century. Initially, records were made using shellac, but vinyl became the preferred material due to its durability and superior sound quality. Over time, the technology for creating vinyl records improved, leading to the development of various mastering techniques, including DMM.
What is Direct Metal Mastering (DMM)?
Direct Metal Mastering is a technique where the audio is cut directly onto a metal disc, typically copper, instead of the traditional lacquer-coated aluminum disc. This method, which emerged in the late 1970s, offers a distinct approach to vinyl mastering, and it’s the technique we exclusively use at Solid-Merch for our custom vinyl record pressings for independent bands and labels.
The DMM Process
The DMM process involves several detailed steps to ensure the production of high-quality custom vinyl records.
- Cutting the Master: In DMM, the audio signal is fed directly to a cutting lathe equipped with a diamond stylus. This stylus engraves the audio grooves into a copper-coated disc. The precision of this process helps in accurately capturing the audio details.
- Electroplating: After the master is cut, it undergoes electroplating. The copper master is coated with a layer of nickel to create a negative image of the grooves, known as the father. This father is then used to produce a positive image (the mother), which can create multiple stampers.
- Manufacturing the Stamper: The stamper is the final negative copy used to press the vinyl records. It’s created from the mother and is mounted onto the pressing machine. The stamper’s grooves mirror the original audio, ensuring high fidelity during the pressing process.
- Pressing the Vinyl: The stamper is placed into a hydraulic press, along with a puck of vinyl material. Under heat and pressure, the vinyl is pressed into the grooves of the stamper, creating the final record. The excess vinyl is trimmed off, and the record is cooled and inspected for quality.
Why Solid-Merch Uses DMM
At Solid-Merch, we aim to provide our clients with high-quality vinyl pressings that meet their specific needs. Here are some reasons why we have chosen to use DMM:
- Detailed Sound Reproduction: DMM allows us to capture fine audio details, providing a clear and precise sound that many of our clients appreciate.
- Efficient Production: The DMM process can streamline production, helping us to meet deadlines and deliver products in a timely manner.
- Durability: The metal masters used in DMM are robust, which helps in producing consistent, high-quality pressings over longer runs.
Considerations for DMM
While we at Solid-Merch value the benefits of DMM, we understand that different mastering techniques may be preferred by different audiophiles and music producers. We are always open to discussing the best approach for each project to ensure the final product aligns with our clients’ expectations.
Real-World Applications
Many of the records pressed at Solid-Merch using DMM have been well received by artists and fans alike. By offering DMM, we provide an option that captures the intricacies of audio recordings in a way that some of our clients prefer.
Direct Metal Mastering is the method we use at Solid-Merch to press high-quality vinyl records. By understanding the DMM process and its benefits, we can better serve our clients and meet the diverse needs of the music community. Whether you’re an artist, a producer, or an audiophile, we are here to help you achieve the sound and quality you desire in your vinyl pressings.
What is Music Licensing and Why Does It Matter?
Navigating the complexities of copyright and licensing is essential for any independent artist or record label. Ensuring you have the knowledge and tools to release your music legally is paramount in the music industry.
Understanding copyright intricacies can be daunting but is crucial for protecting your work and respecting others’ rights. Today, we’re breaking down the difference between cover songs and samples, and why obtaining the proper licensing is crucial. We’ll guide you through the necessary steps to legally release cover songs and use samples.
Cover Songs vs. Sampling: What’s the Difference?
Music creation often involves inspiration from existing works. While cover songs and sampling are two common ways artists engage with existing music, they are fundamentally different. Each requires distinct types of licensing. Understanding these differences is the first step toward a successful and legal release of your music.
Cover Songs:
What Is It?: A cover song is a new performance or recording of an existing song by someone other than the original artist. Cover songs perform the song in your own style but stay true to the original composition’s lyrics and melody. Covers can range from faithful renditions to completely reimagined versions, but the underlying composition remains the same.
Licensing Required: To legally release a cover song, you need to obtain a mechanical license. This license allows you to reproduce and distribute the song. The mechanical license ensures that the original songwriters receive royalties from your version of their song. Services like Harry Fox Agency (HFA) or Easy Song Licensing can help you secure this license quickly and efficiently.
Why It’s Important: Without the proper mechanical license, you could face legal action from the original songwriters or their representatives. The mechanical license not only protects you from lawsuits but also ensures that the original creators get their deserved royalties. Releasing your cover song legally means you can share your work without worries. You also contribute to the financial well-being of the original artists.
Sampling:
What Is It? Sampling involves taking a portion of an existing sound recording and reusing it in a different song or piece of music. This can be anything from a short snippet to a longer segment. Sampling can include loops, beats, or even vocals from the original track, and it can be manipulated in various ways to fit the new creation.
Licensing Required: Sampling is more complex than covering a song, as it requires multiple licenses. You need a master use license from the owner of the original recording. If you’re using a sample in a visual context, a synchronization license is needed. Additionally, you need clearance for the composition from the original songwriters or publishers. Each of these licenses ensures that both the original recording and composition are used legally.
Why It’s Important: Using samples without proper clearance can lead to significant legal issues, including lawsuits and hefty fines. Unauthorized sampling can result in your music being taken down from platforms. You could also face claims for damages from the original artists. Proper licensing ensures you respect the intellectual property of other artists and avoid potential legal battles, allowing you to focus on your creative work.
Why Purchasing the Proper Licensing Is Crucial
The music industry thrives on the creativity and originality of its artists. However, this creativity must operate within the legal framework established to protect intellectual property. Proper licensing is not just a legal formality; it is a critical component of professional and ethical music production.
Legal Protection: Proper licensing protects you from legal repercussions and potential lawsuits, ensuring your music can be enjoyed without any legal interruptions. By obtaining the necessary licenses, you safeguard your work and your career from the costly and time-consuming consequences of copyright infringement.
Respect for Original Artists: Licensing ensures that original artists and songwriters are fairly compensated for their work. This fosters a respectful and sustainable music community where artists can thrive and continue to create. When you pay for a license, you support the ecosystem that allows artists to make a living from their work.
Professional Integrity: Demonstrating your commitment to legal and ethical standards enhances your reputation within the industry. It shows that you respect the rights of other creators and are dedicated to operating within the bounds of the law. This builds trust with fans, collaborators, and industry professionals, which is invaluable for long-term success.
The Consequences of Ignoring Licensing
Failing to obtain the proper licenses can have severe consequences. Legal actions, financial penalties, and damage to your reputation are just a few of the potential risks. Beyond the immediate legal and financial repercussions, ignoring licensing can alienate you from the community of artists and professionals who value ethical practices.
Consider the high-profile cases where artists have faced lawsuits for sampling without permission. These cases often result in significant settlements and legal fees, not to mention the negative publicity that can tarnish an artist’s career. Even if you believe that your use of a sample falls under “fair use,” it’s always better to err on the side of caution and secure the necessary permissions.
How to Obtain Licenses for Cover Songs and Samples
Securing the appropriate licenses may seem daunting, but there are resources and services available to help you navigate the process. Here’s a step-by-step guide to obtaining licenses for cover songs and samples:
For Cover Songs:
- Identify the Original Song: Make sure you have all the details about the song you wish to cover, including the title, songwriter(s), and publisher.
- Choose a Licensing Service: Platforms like Harry Fox Agency (HFA) and Easy Song Licensing offer user-friendly services to obtain mechanical licenses.
- Apply for the License: Fill out the necessary forms and pay the required fees. The service will handle the rest, ensuring that the original songwriters receive their royalties.
- Release Your Cover: Once you have the license, you can legally distribute your cover song through any platform.
For Samples:
- Identify the Sample: Determine the portion of the song you wish to sample and gather information about the original recording and composition.
- Contact the Rights Holders: Reach out to the owner of the master recording and the publisher of the composition to request permission.
- Negotiate Terms: You may need to negotiate the terms of the licenses, including the fee and the extent of usage, which could involve legal advisors to ensure everything is properly documented.
- Obtain the Licenses: Once terms are agreed upon, secure the master use license, synchronization license (if applicable), and composition clearance.
- Incorporate the Sample: With the licenses in hand, you can legally use the sample in your music.
Supporting Your Journey
We are dedicated to supporting your journey every step of the way. From providing resources on licensing to offering high-quality merch and promotional materials, we aim to empower independent artists and record labels to succeed. Explore our collection of merchandise designed to help you make your mark in the industry, and stay tuned for more tips and guides on navigating the music business.
By understanding the differences between cover songs and sampling and securing the necessary licenses, you can confidently release your music while respecting the rights of other artists. This not only protects you legally but also fosters a culture of respect and professionalism within the music community.
Remember, obtaining the proper licenses is not just about following the law; it’s about supporting a system that values and compensates creativity. Together, we can build a music industry that respects and rewards the hard work of all its contributor
How To Create Iconic Album Artwork
You album art is often the first point of interaction between an artist and their audience. It’s more than just packaging; it’s a visual representation of the music, an expression of the artist’s vision, and a critical marketing tool. An iconic album cover can leave a lasting impression and become a part of pop culture. So, how do you create an iconic album cover? Here’s a comprehensive guide to help you design an album cover that stands the test of time and resonates with your audience.
Align with the Music’s Theme
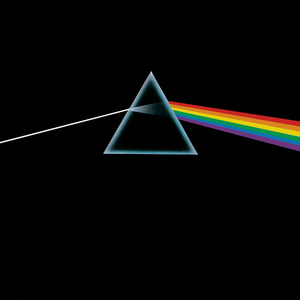
The album cover should be a visual extension of the music it represents. To achieve this, start by deeply understanding the themes, emotions, and stories conveyed in the album. Is the music upbeat and energetic, or is it introspective and somber? Use this understanding to inform your design choices. For example, Pink Floyd’s “The Dark Side of the Moon” features a prism dispersing light, symbolizing the album’s themes of complexity and the human experience. This iconic cover perfectly aligns with the album’s musical and lyrical content, creating a cohesive artistic statement.
Consider Record Bin Visibility

In a physical record store, your album art needs to stand out in a crowded bin. Think about what your cover will look like when partially obscured or displayed alongside many other albums. Bold, contrasting colors and striking imagery can help your album catch the eye. Additionally, consider how your cover design will fit within a series of releases. If you’re planning multiple albums, having a consistent visual theme can create a recognizable brand identity, much like how The Beatles’ “Sgt. Pepper’s Lonely Hearts Club Band” has a distinct yet cohesive visual style.
Timeless Art Over Flashy Trends

Trends come and go, but timeless album art endures. Aim for a design that will remain relevant and appealing for years to come. Avoid overly trendy fonts, colors, or design elements that may quickly become dated. Instead, focus on classic design principles: balance, contrast, harmony, and simplicity. Joy Devision’s “Unknown Pleasures” is a prime example of timeless design. Its simplicity and elegance have made it one of the most recognizable album covers in history.
Correct Side Spine Orientation
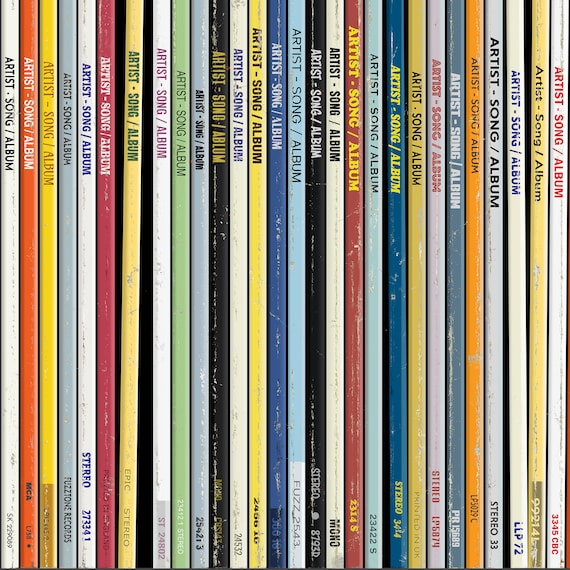
One often-overlooked detail is the orientation of the side spine text. Ensure that the text on the spine of your album art is oriented correctly so that it’s easily readable when stored on a shelf. This small but significant detail can greatly enhance the user experience. Incorrect spine orientation can be a major annoyance for collectors and fans, detracting from their overall enjoyment of the album.
Mindful Sticker Placement
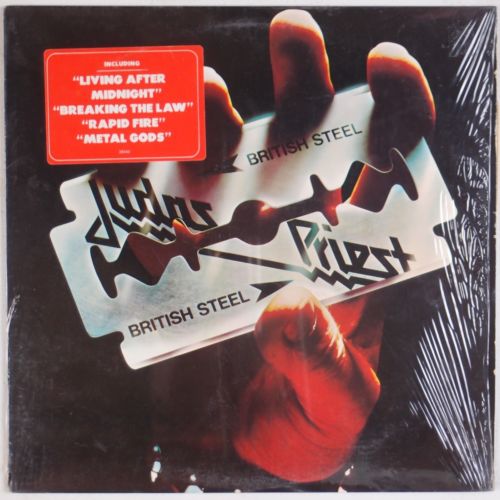
Stickers can be a useful tool for promoting special features or editions of an album, but they should be used judiciously. Make sure any stickers placed on the album cover do not detract from the album artwork. A well-placed sticker can enhance the overall presentation, while a poorly placed one can obscure important design elements and disrupt the visual flow. Consider using transparent or subtly designed stickers that complement rather than compete with the cover art.
UPC Placement
The placement of the Universal Product Code (UPC) is another important consideration. Rather than integrating the UPC into the cover art, which can disrupt the visual aesthetics, place it on a removable sticker. This allows the cover art to remain unblemished and keeps the design clean and cohesive. Fans and collectors will appreciate the thoughtfulness of this decision, as it preserves the integrity of the artwork.
Material and Finish Considerations
The choice of materials and finishes can significantly impact the appearance and feel of the album cover. Different finishes, such as uncoated stock, high gloss, or matte, can change the way colors and images appear. Uncoated stock may mute colors, giving a more subdued and classic look, while high gloss can make colors pop and add a modern sheen. Matte finishes offer a subtle, sophisticated texture. Consider how these finishes will affect the overall presentation and choose one that best complements your design and the album’s theme.
For vinyl orders of 250+ units, we have multiple different finishes to choose from!
Maintain Balance
A well-balanced design is pleasing to the eye and effectively communicates the intended message. Balance involves the distribution of visual elements such as color, light, and texture. Ensure that no part of the cover feels too heavy or too light. Symmetrical designs are inherently balanced, but asymmetrical designs can also achieve balance through careful arrangement of elements. The goal is to create a harmonious composition that draws the viewer in and keeps them engaged.
Practical Tips for Designing Album Art
Start with a Clear Concept: Before diving into the design process, start with a clear concept. Understand the album’s themes and the artist’s vision. Sketch out ideas and experiment with different layouts and elements. This foundational work will guide your design decisions and ensure that the final product aligns with the album’s essence.
Collaborate with the Artist: Collaboration between the designer and the artist is crucial. The artist’s input can provide valuable insights and help ensure that the cover accurately reflects their vision. Regular communication and feedback loops can lead to a more cohesive and satisfying final product.
Use High-Quality Images and Graphics: Whether you’re using photographs, illustrations, or graphic elements, ensure that they are high quality. Low-resolution images can appear pixelated and unprofessional when printed. Invest in professional photography or high-resolution stock images if necessary.
Typography Matters: Typography plays a significant role in the overall design. Choose fonts that complement the artwork and the music’s theme. Ensure that the text is legible and appropriately sized. Avoid using too many different fonts, as this can make the design look cluttered and inconsistent.
Mockups and Prototypes: Create mockups and prototypes to see how the cover will look in various contexts. Print physical copies to check how the design translates from screen to print. This step can help identify any issues with colors, alignment, or legibility before the final print run.
Gather Feedback: Before finalizing the design, gather feedback from a small group of trusted individuals. This could include the artist, members of the band, or even a focus group of fans. Constructive feedback can provide new perspectives and help refine the design.
Consider the Whole Package: Remember that the album cover is part of a larger package. Consider how the design will work across different formats, such as digital thumbnails, vinyl, CDs, and promotional materials. Consistency across all platforms will strengthen the overall branding.
Incorporate Personal Touches: Adding personal touches or unique elements can make the album cover more memorable. This could be a hidden detail in the artwork, a special message in the liner notes, or a unique fold or die-cut in the packaging.
Conclusion
Creating an iconic album cover is a blend of art, strategy, and attention to detail. It requires a deep understanding of the music, a clear vision, and a thoughtful approach to design. By aligning the cover with the album’s theme, considering how it will look in various contexts, prioritizing timeless art, ensuring proper orientation and placement of elements, choosing the right materials and finishes, and maintaining balance, you can create an album cover that stands out and endures.
Figure out the main focus using one of these categories as your centerpiece:
- A strong image or photograph: A compelling image can convey the album’s mood and themes powerfully. Think of iconic covers like The Beatles’ “Abbey Road” or Nirvana’s “Nevermind,” where the images are instantly recognizable and deeply connected to the music.
- A tasteful combination of color and texture: Using color and texture effectively can create a visually striking cover that grabs attention. For example, the bold colors and textures of Prince’s “Purple Rain” or the minimalist yet textured design of Pink Floyd’s “The Dark Side of the Moon.”
- Very intentional and artistic typography: Typography can be the focal point of your design, as seen in albums like The Rolling Stones’ “Sticky Fingers” or Kanye West’s “Graduation.” Thoughtful use of typography can convey a lot about the music and the artist’s style.
Using one of these categories as the main theme of your design, instead of taking a kitchen sink approach, tends to have a cleaner and more direct result that will leave a lasting impression with the audience.
Remember, the album cover is more than just a piece of art; it’s a visual representation of the music and a crucial part of the listener’s experience. Take the time to get it right, and you’ll create a lasting impression that resonates with fans and becomes a cherished part of their music collection.
Whether you’re an artist, a designer, or a label, these guidelines will help you create an album cover that not only catches the eye but also captures the essence of the music within. Happy designing!
